24/7 Phone Services
Mon - Sat 8:00 - 17:30, Sunday

-
-
Visit Our Place
Alberta 11209, Canada
Preloader Close

Swapping out an old light fixture for a new one can dramatically change the look and feel of a room without breaking the bank. If you’re a homeowner or renter who loves a good DIY project, installing a light fixture might seem like a daunting task, but with the right guidance, it’s often manageable. This guide will walk you through the process, focusing on safety first, helping you decide if this is a project you can tackle yourself or if it’s better to call in a professional. We’ll cover everything from the tools you’ll need to the final safety checks, making sure your new light shines bright and safely.
Can You Install a Light Fixture Yourself?
Many homeowners and renters can absolutely install a light fixture themselves, especially if they’re simply replacing an existing fixture in the same spot. This usually involves disconnecting the old fixture and connecting the new one to the existing wiring. It’s a great way to save money and gain a sense of accomplishment.
However, there are times when it’s always better and safer to call a licensed electrician. For instance, if you’re installing a new fixture where no wiring currently exists, or if you’re dealing with old, questionable wiring (like aluminum wiring, which needs special handling), it’s best to leave it to the pros. Also, if you’re unsure about the voltage or the existing electrical box’s capacity, an electrician can ensure everything is up to code and safe. Prioritizing electrical safety is paramount.
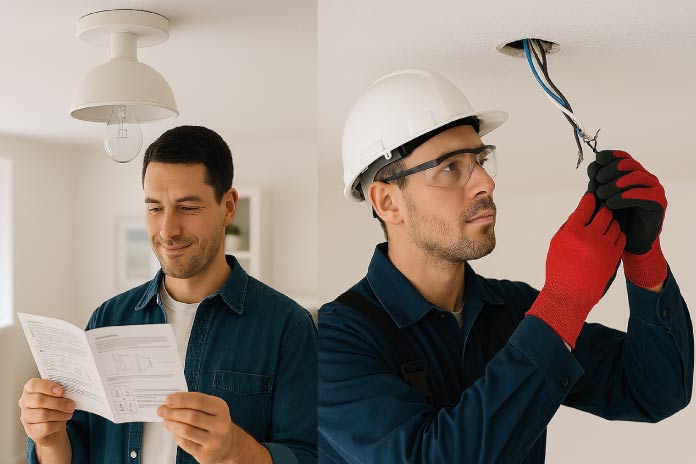
(Image suggestion: A split image or infographic showing a homeowner happily installing a fixture on one side, and on the other, an electrician working on more complex wiring, with text “DIY or Pro?”)
Tools and Materials You’ll Need
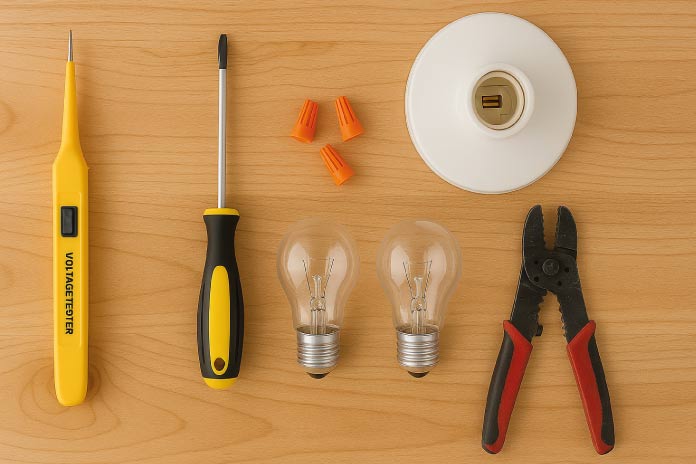
Before you begin, gather all your supplies. Having everything ready saves time and ensures a smoother process.
Here’s a list of common tools and materials you’ll likely need:
- Screwdrivers: Both Phillips and flathead screwdrivers are essential for removing old fixtures and securing new ones.
- Voltage Tester (Non-contact is best): This is your most important safety tool! It confirms that the power is truly off before you touch any wires.
- Wire Strippers: Used to remove the insulation from wires, exposing the copper conductor for connections.
- Ladder: Make sure it’s stable and tall enough for you to comfortably reach the fixture without stretching.
- New Light Fixture: Of course! Make sure it’s suitable for your space and electrical box.
- Wire Nuts: These small plastic caps twist onto connected wires to secure them and insulate the connection.
- Electrical Tape: Great for extra insulation around wire nut connections or to secure loose wires.
- Pliers (Optional but handy): For gripping or bending wires.
- Pencil: To mark the location of mounting holes if needed.
- Work Gloves: For protection, especially if handling older, dusty fixtures.
Safety Tip: Always use insulated tools when working with electricity, and wear rubber-soled shoes. This provides an extra layer of protection against accidental shocks. My personal experience has taught me that a little extra caution, like double-checking your voltage tester and ensuring your ladder is stable, can prevent big headaches. Don’t rush!
(Image suggestion: A flat lay photo of all the listed tools neatly arranged, perhaps on a workbench.)
How to Safely Turn Off the Power Before Installation
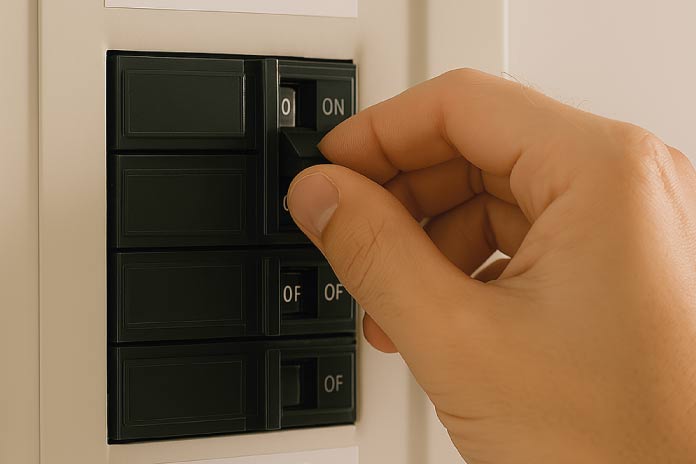
This is the most critical step. Never work on electrical wiring with the power on.
- Identify the Correct Circuit Breaker: Go to your home’s electrical service panel (usually in a basement, garage, or utility closet). Look for labels that indicate which breaker controls the lights in the room you’re working in. If they’re not labeled, you might need someone to stand in the room with the light on while you flip breakers one by one until the light turns off. Once you find it, mark it for future reference.
- Shut Off Power to the Fixture: Flip the identified circuit breaker to the “OFF” position. It’s also a good idea to put a piece of electrical tape over the breaker switch or a “DO NOT TOUCH” note to prevent anyone from accidentally turning it back on while you’re working.
- Confirm Power is Off: Return to the light fixture. Use your non-contact voltage tester to verify that there is no power. Touch the tester to the wires leading to the fixture, and then inside the electrical box. If it beeps or lights up, the power is still on. Go back to the breaker panel and reconfirm you’ve flipped the correct one. Do not proceed until the voltage tester indicates no power. This step cannot be emphasized enough. I’ve heard countless stories (and had a close call myself!) where people assumed the power was off only to find out otherwise. Always test, test, test.
(Image suggestion: A graphic illustrating a hand flipping a circuit breaker to the OFF position, and another image of a voltage tester being used on wires.)
Step-by-Step Lighting Installation Instructions
Now that you’ve confirmed the power is off, you’re ready to start the installation process.
Step 1 – Remove the Old Fixture
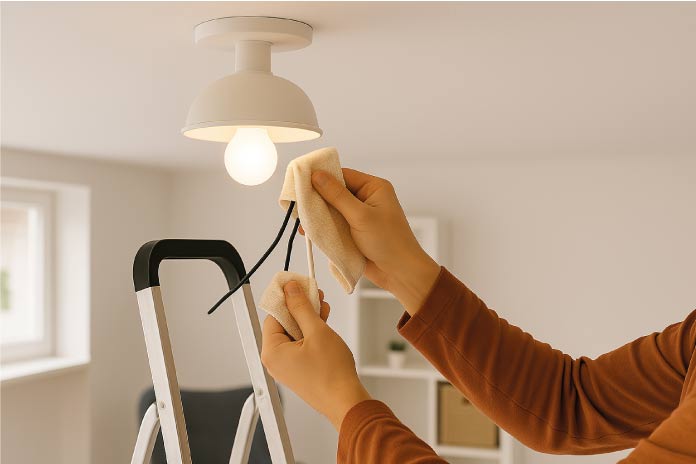
Carefully unmount the old light fixture from the ceiling or wall. Most fixtures are held by a couple of screws that attach to a mounting bracket. Once unscrewed, gently lower the fixture. You’ll see several wires connected with wire nuts.
- Disconnect Wiring: Unscrew the wire nuts, twisting them counter-clockwise. Separate the wires: typically black (hot), white (neutral), and bare copper or green (ground). Keep these organized in your mind – black goes to black, white to white, and ground to ground.
- Remove Mounting Bracket: Once the wires are free, remove the old mounting bracket from the electrical box. You’ll typically replace this with the new fixture’s bracket.
(Image suggestion: A close-up photo of wires being disconnected from an old light fixture, with wire nuts visible.)
Step 2 – Prepare the Wiring
Before connecting the new fixture, take a moment to examine the existing wires coming from your ceiling.
- Check Wire Condition: Look for any frayed or damaged insulation. If the insulation looks brittle or cracked, you might need to trim the wires back to a healthier section using your wire strippers.
- Trim and Strip if Needed: The ends of the wires should have about 1/2 to 3/4 inch of exposed copper. If not, carefully strip off the insulation with your wire strippers. Be careful not to nick the copper wire itself.
- Align Colors: Make sure you’ve correctly identified the black (hot), white (neutral), and ground wires from both your ceiling and your new fixture.
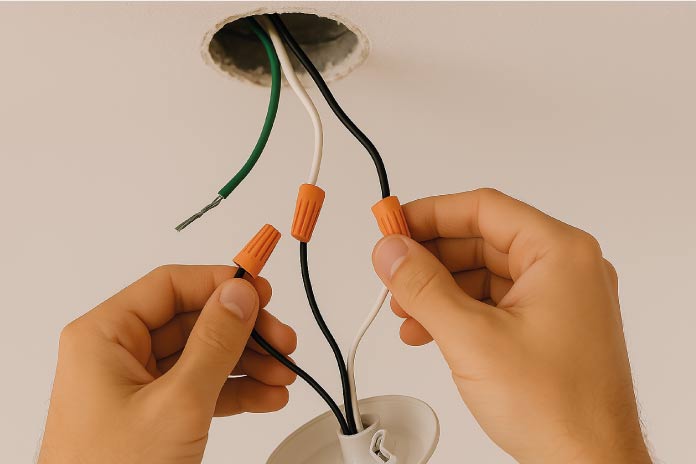
Step 3 – Connect the New Fixture
This is where the magic happens! The goal is to create secure and safe electrical connections.
- Match Wires:
- White to White: Connect the white (neutral) wire from the new fixture to the white (neutral) wire from the ceiling box.
- Black to Black: Connect the black (hot) wire from the new fixture to the black (hot) wire from the ceiling box.
- Ground to Ground: Connect the bare copper or green (ground) wire from the new fixture to the bare copper or green (ground) wire from the ceiling box. If your electrical box is metal and has a ground screw, connect the ground wire to that as well.
- Secure with Wire Nuts: Hold the ends of the two wires you’re connecting side-by-side, making sure their exposed copper ends are even. Twist a wire nut clockwise onto the wires until it’s snug and secure. Give each wire a gentle tug to ensure it won’t pull out.
- Wrap with Electrical Tape (Optional but Recommended): For extra security and insulation, wrap a bit of electrical tape around each wire nut and the base of the connection. This helps prevent the wire nut from coming loose over time.
- Tuck Wires: Carefully fold the connected wires back into the electrical box, making sure they aren’t pinched or strained.
(Image suggestion: A step-by-step graphic showing the wire connection process: 1. Twisting wires together, 2. Applying wire nut, 3. Tugging to test, 4. Wrapping with tape.)
Step 4 – Secure the Fixture and Install Bulbs
With the wires connected, it’s time to mount your new light fixture.
- Attach Base to Ceiling Bracket: Your new fixture will likely come with a mounting bracket that attaches to your electrical box. Secure this bracket first, then align the fixture base with the bracket and use the provided screws to tighten it securely against the ceiling or wall. Make sure it’s flush and stable, with no wobbling.
- Install Bulbs: Once the fixture is firmly in place, screw in the light bulbs. Use the wattage recommended by the fixture manufacturer.
(Image suggestion: A photo of a new light fixture being screwed into the ceiling, or a hand installing a light bulb into a newly mounted fixture.)
Step 5 – Turn Power Back On and Test
The moment of truth!
- Go Back to the Breaker: Return to your electrical service panel.
- Restore Power: Remove any tape or notes, and carefully flip the circuit breaker back to the “ON” position.
- Flip the Switch to Test: Go back to the room and flip the light switch. Your new light should illuminate! If it doesn’t, don’t panic – move on to the troubleshooting section.
Read more: Everything About LED Lights: From Tips to Choose to Commercial Upgrades
Troubleshooting Tips
Sometimes, things don’t work perfectly on the first try. Here are some common issues and what to check:
- Fixture Doesn’t Turn On:
- Check the Breaker: Is the circuit breaker fully “ON”? Sometimes it might trip to a middle position. Flip it fully off, then fully on.
- Check Bulbs: Are the bulbs screwed in tightly? Are they working bulbs? Try a different bulb.
- Check Connections: Go back and recheck all your wire connections inside the fixture. Are the wire nuts tight? Is there good contact between the wires?
- Voltage Tester Again: Re-test for power at the fixture with your voltage tester.
- Flickering Lights:
- This often indicates a loose connection. Turn off the power immediately and re-tighten all wire nuts.
- Ensure the bulbs are compatible with any dimmer switches you might have.
- Breaker Trips Immediately:
- This usually means there’s a short circuit. Turn off the power immediately! You’ll need to re-check all your wiring connections very carefully to ensure no bare wires are touching each other or the metal electrical box. This is a clear sign to call an electrician if you’re not confident in finding the fault.
When to Call an Electrician: If you’ve tried troubleshooting and the problem persists, or if you feel uncomfortable at any point during the process (especially if the breaker keeps tripping), it’s time to call a licensed electrician. Don’t risk your safety or your home’s electrical system.
Final Safety Check and Maintenance Advice
After your new light is working, take a moment for a final check:
- Check for Loose Wires or Wobbly Parts: Gently push on the fixture to ensure it’s firmly attached to the ceiling or wall. There should be no wobbling.
- Listen and Smell: Pay attention for any buzzing sounds or burning smells, which could indicate a problem.
- Quick Maintenance Tips:
- Cleaning: Dust your light fixtures regularly with a soft, dry cloth to keep them shining bright. For glass components, you can use a damp cloth. Always turn off the power to the fixture before cleaning.
- Check Wiring (periodically): Every few years, especially if you notice flickering or other issues, you might want to carefully turn off the power, remove the fixture cover, and just visually inspect the wire connections to ensure they are still tight and secure.
Read more: Common Electrical Distribution Problems & How to Solve Them
Conclusion: DIY or Call a Pro?
Installing a new light fixture can be a rewarding DIY project, empowering you to refresh your home’s look and save money. By following these step-by-step instructions and, most importantly, prioritizing electrical safety, many homeowners can confidently tackle this task.
Remember, knowing your limits is key. If you ever feel uncertain, encounter unexpected wiring, or if a problem arises that you can’t resolve through basic troubleshooting, there’s no shame in calling a licensed electrician. Their expertise ensures your home’s electrical system remains safe and functional. With a little confidence and a lot of caution, you can enjoy your beautifully lit space!
FAQ Section
Q: How long does it take to install a light fixture? A: For a basic replacement, it can take anywhere from 30 minutes to an hour, assuming you have all your tools ready and the power is easily identified and shut off. More complex fixtures or unexpected issues can extend the time.
Q: What if my home has aluminum wiring? A: Important: Aluminum wiring is a known fire hazard when connected to standard copper fixtures or switches without proper connectors. If your home has aluminum wiring, it’s highly recommended to consult a licensed electrician. Special connectors (CO/ALR rated) are required to safely bridge aluminum and copper wires, and an electrician can ensure this is done correctly and safely.
Q: Can I install a ceiling fan the same way as a light fixture? A: While the basic electrical connection steps are similar (power off, wire matching), ceiling fans are heavier and often require a special electrical box designed to support their weight and vibration. They also have additional wiring for fan speed controls and often a remote receiver. It’s generally a more complex DIY project than a simple light fixture, and if you’re unsure, it’s best to consult a professional.
For more comprehensive electrical safety information and best practices, consider reviewing resources from organizations like the National Fire Protection Association (NFPA).
Leave A Comment